OS/2 Guest Additions Installation Instructions
OS/2 Guest Additions Installation Instructions
I have installed OS/2 Warp 4.52 in a VirtualBox 6.0.14 VM on a Windows 10 host. It seems to run OK. I have not however been able to install Guest Additions. Instructions on how to install the Guest Additions seem to vary among different versions of OS/2. Is there a best how-to for this version?
-
socratis
- Site Moderator
- Posts: 27329
- Joined: 22. Oct 2010, 11:03
- Primary OS: Mac OS X other
- VBox Version: PUEL
- Guest OSses: Win(*>98), Linux*, OSX>10.5
- Location: Greece
Re: OS/2 Guest Additions Installation Instructions
Have you actually tried the instructions that are included with the VirtualBox Guest Additions (GAs) ISO?raywood wrote:Instructions on how to install the Guest Additions seem to vary among different versions of OS/2. Is there a best how-to for this version?
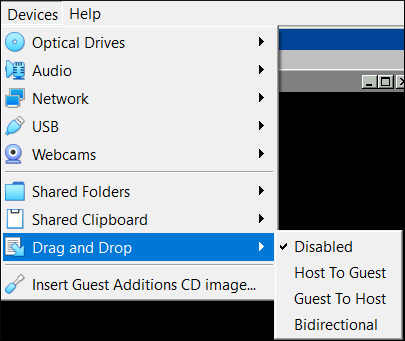
With the VM window having the focus, go to the host's menu "Devices" » "Insert Guest Additions CD Image...". In there you'll find the "<CD>/OS2/readme.txt". As the name implies, read it.
I'll include it in case it might help future readers:
VirtualBox Guest Additions Driver for OS/2

Prerequisites:
- the generic VESA gradd driver is being used (gengradd)

Updated installation instructions:
- boot to the OS/2 command prompt (alt-f1 while the white blob is displayed during early boot, then f2)
- copy all files into the directory C:\OS2Additions
- make a backup copy of C:\os2\dll\gengradd.dll
- copy our gengradd.dll to C:\os2\dll
- copy libc06*.dll to C:\os2\dll
- comment out the 'device=C:\os2\boot\mouse.sys' line in C:\config.sys (put 'rem' in front)
- append 'device=C:\OS2Additions\vboxguest.sys' to C:\config.sys
- append 'device=C:\OS2Additions\vboxmouse.sys' to C:\config.sys
- append 'ifs=C:\OS2Additions\vboxsf.ifs' to C:\config.sys
- append C:\OS2Additions to PATH if you want to use VBoxControl.exe and shared folders.
- add  'C:\OS2Additions\VBoxService.exe' to the start of C:\startup.cmd
- reboot


Shared folders
--------------

The shared folders are brand new in 6.0 and considered beta quality.

To attach a shared folder to a drive letter:
        VBoxControl sharedfolder use <drive> <shared-folder-name>

To detach a shared folder from a drive:
        VBoxControl sharedfolder unuse <drive>

To see available shared folders (any guest type):
        VBoxControl sharedfolder list

The shared folders are accessible via UNC too:
        dir \\vboxsf\folder\
    or: dir \\vboxsvr\folder\
    or: dir \\vboxsrv\folder\

The VBoxService can also attach and detach shared folders to/from drive
letters, if you check the 'Auto-Mount' flag in the config (host GUI).
Do NOT send me Personal Messages (PMs) for troubleshooting, they are simply deleted.
Do NOT reply with the "QUOTE" button, please use the "POST REPLY", at the bottom of the form.
If you obfuscate any information requested, I will obfuscate my response. These are virtual UUIDs, not real ones.
Do NOT reply with the "QUOTE" button, please use the "POST REPLY", at the bottom of the form.
If you obfuscate any information requested, I will obfuscate my response. These are virtual UUIDs, not real ones.
Re: OS/2 Guest Additions Installation Instructions
OK. That was my question: what is the best source of instructions? You've confirmed that the readme is it. I followed the version of the readme included with my version of OS/2. Those instructions didn't work. Here's the detailed writeup. If you see something specific that I did wrong, great -- please let me know.
Last edited by mpack on 12. Jan 2022, 10:19, edited 1 time in total.
Reason: Remove offsite link.
Reason: Remove offsite link.
-
socratis
- Site Moderator
- Posts: 27329
- Joined: 22. Oct 2010, 11:03
- Primary OS: Mac OS X other
- VBox Version: PUEL
- Guest OSses: Win(*>98), Linux*, OSX>10.5
- Location: Greece
Re: OS/2 Guest Additions Installation Instructions
Please post what fails here, and not on your personal website. I'm seriously thinking about removing the link actually...
Do NOT send me Personal Messages (PMs) for troubleshooting, they are simply deleted.
Do NOT reply with the "QUOTE" button, please use the "POST REPLY", at the bottom of the form.
If you obfuscate any information requested, I will obfuscate my response. These are virtual UUIDs, not real ones.
Do NOT reply with the "QUOTE" button, please use the "POST REPLY", at the bottom of the form.
If you obfuscate any information requested, I will obfuscate my response. These are virtual UUIDs, not real ones.